
Winter is here to stay for a while but that doesn’t mean that you can’t go take pictures out in the snow if you choose. Winter is one of the most magical times of year for outdoor photos. With a few considerations, you can enjoy taking lots of pictures outdoors hassle-free.
1. Keep Your Camera Cold Before You Go Shoot

Something to think about is to make sure that your camera is at the same temperature as the outside air before you start shooting. This doesn’t seem to make any sense until you think about why.
If your camera, especially your lens, is too warm when you start your photo session outside, then you have to worry about condensation on the lens. This will obscure whatever you are trying to take pictures of. Water will condense on both the inside and the outside of the lens. The inside is not easily accessed at best.
To counteract this problem, make sure that your camera is chilled before you take it outside with you. The refrigerator or the freezer will work. If you are going out on location someplace, simply place your camera in the trunk of your car and it will acclimate during your drive there.
2. Bring Lots of Batteries and Keep Them Warm
While your camera needs to keep cool, your camera batteries need to keep warm. The cold will suck the power right out of them faster than almost anything else. You will find that you have power for only a handful of photos if you don’t take appropriate steps to ensure power for your camera.
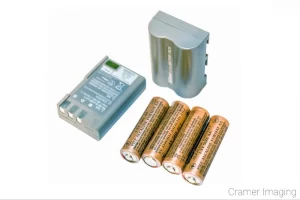
There are a couple of ways to make sure you have enough battery life for your outdoor winter shoot. You must remove your battery from your camera while it’s cooling off and you must bring lots of already charged batteries with you. Keep them someplace warm and accessible such as your pocket so you have them when you need them.
3. Dress Warmly
One of the most important parts of successful outdoor winter photo sessions is that you come back in one piece. This means that you don’t contract a case of hypothermia or frostbite while out in the field. For this, you must remember to dress warmly and properly for the situation.

If you know you’re venturing out into potentially dangerous temperatures/wind chills, then please make sure you have all the clothing you need. Bring a jacket/coat, hat, scarf, gloves, warm boots, and more. Also make sure you dress in layers to add extra insulation. Just don’t layer too tightly or else the layers won’t work properly. I’ve endured hours of very cold toes because I wore too thick socks for the boots I also wore. To say it was unpleasant is an understatement.
4. Get Gloves or Mittens With Removable Tips
I’ve been shooting photos outside in all kinds of temperatures for a few years now. One thing that I’ve learned is that there is no mitten nor glove which can make up for the friction of the human finger tip when manipulating buttons and dials on your camera.

If you are planning an outdoor winter photo shoot longer than a couple of minutes or so, then you need to make sure that you have hand protection that will grant access to your fingertips. Gloves and mittens will slip on the controls and will fail to turn dials. There are several different options on the market which will fill this need. The most common version is mittens with no fingertips.
Choose your hand insulation carefully as you will be exposing your bare skin to the cold during your session. You don’t want to freeze your fingers temporarily or permanently. Numb fingers won’t operate your camera controls with much precision at all. Check out this article to see how I keep my hands warm for winter photos.
5. Have a Warm Drink Waiting

There’s no two ways about it. Taking outdoor winter photographs, no matter what kind, is a cold business. You need something to help you warm up afterwards. The single best way to warm up is with hot liquids. This only makes sense because of how much water our bodies are made up from.
One of my favorite warm-up methods is a big mug of hot chocolate with marshmallows or whipped cream. Add any flavorings or toppings of your choice. Perhaps you like crushed peppermint candy canes or cinnamon. Anything you add should enhance your hot chocolate experience. Likewise, something like this drink option will help you recover much quicker from the cold.
Just make sure you aren’t planning on staying out in the cold. Imbibing hot liquids will raise your body temperature just enough for the cold to really wreak havoc if you stay out in it.
Conclusion
Successful winter photos in the outdoors are mostly about keeping yourself and your batteries warm. The rest is about keeping your camera cool. If you take a little time and make sure that these matters are attended to, you will have a much better chance at scoring amazing winter photos.


Best Sellers

Cramer Imaging Newsletter

Receive monthly updates in your inbox from us.

