So, we’ve started into a series on the photography merit badge for the Boy Scouts of America. It’s time that we followed that up with a part 2 covering more of the photography merit badge requirements. We only just started the requirements before and there’s several to go. Let’s dive into the next installment of the photography merit badge.
![]()
Now, for the obligatory disclaimer: I must say that I’m NOT your merit badge counselor (for photography or otherwise). This is especially true if I don’t live in the same council as you do. You will need to find someone local to sign off that you have met the requirements for this merit badge. Your local council office can assist you with finding a current photography merit counselor if you don’t know where to find one.

What I can do is to help you out with some of the research and basic learning aspects of the photography merit badge requirements. As there are currently no less than 5 groups of these requirements, I will break this up into 7 different articles for you to digest in your leisure. This article is part 2. You can find links to the other article(s) at the top.
Part 2. Elements of Composition: Light
The second part of the photography merit badge requirements states the following:
2. Explain how the following elements and terms can affect the quality of a picture:
a. Light—natural light (ambient/existing), low light (such as at night), and artificial light (such as from a flash)
b. Exposure—aperture (f-stops), shutter speed, ISO
c. Depth of field
d. Composition—rule of thirds, leading lines, framing, depth
e. Angle of view
f. Stop action and blur motion
g. Timing
Now, there are several elements of composition here. Each has its own part to play in a final photograph. We’ll break these all down individually so they’re easier to digest. Due to the length of this article, we’ll only be discussing the light portion. We’ll cover the rest of part 2 in subsequent articles.
A. Light
In the grand scheme of things regarding photography, there are only two basic elements: light and shadow. It is in your use and manipulation of these elements with your tool, the camera, which makes a photograph. Since there are 3 different light sources mentioned above, I’ll approach all of them.
As far as how each light source affects the quality of a picture, it’s simple. Enough light will properly light a scene, even with camera adjustments. Proper exposure is a delicate balance struck between the bright and dark parts of a photo where all important details are preserved in the resulting photo. Too much light will make the scene too bright for the subject matter you wish to photograph. Too little light will make the photo too dark. You will lose detail in photos which are too bright (overexposed) or too dark (underexposed).
Now on to each kind of light source.
Ambient Light
The most available light for photography (and coincidentally the most flattering as well) is ambient light. It’s simply whatever light is available on the subject without adding anything extra. Sources of ambient light include the sun, lamps, windows, the moon, candles, and any other light source which you already have going in the background.

You don’t add anything extra to get ambient light. That is the crucial point to ambient lighting. You may use reflectors to redirect such light or you may move your subject (if possible) to better utilize such light. However, you don’t add anything to the light already available on the scene. If it’s not enough light, then you adjust your camera settings to compensate.
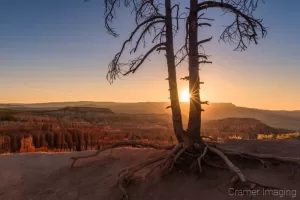
Ambient light often (though not always) gives you a full spectrum of light from deep red to violet. This means that your photos will often be properly colored without need for much color correction in post-processing. On those occasions when ambient light is not a full spectrum of color, you can often color-correct in post-processing. It’s using ambient light where you can get photos like these:


Keep in mind that with certain kinds of photography, such as landscape photography, ambient light is your ONLY lighting option. There’s simply no man-made light source bright enough to light up a landscape scene.

Now as far as how ambient light affects a scene, it’s simple. Just like the above statement, ambient light can affect the overall quality of the picture’s detail loss/preservation. A properly lit scene, using ambient light, will preserve maximum important details. Too much or too little ambient light (without an artificial assist) will result in important detail loss. Unless you are shooting at night (uncommon for many different genres of photography), then ambient light should usually work in your favor to properly light a scene.
Low Light

Low light conditions in photography, while also ambient light, are most often found at night. However, you can artificially create such indoors by closing doors and windows, turning off lights, etc. Due to the unique requirements of low light conditions, most genres of photography avoid low lighting in general. You will find some photographers (such as portrait photographers) who will experiment with low light but there’s really only one genre which routinely uses low light: landscape photography.
Low light conditions will, by definition, underexpose any photograph attempted. This means that it will unavoidably be dark with detail loss (even solid black with all subject matter lost) depending upon camera settings. You can make adjustments to work in low light environments but this is generally not something which a beginner should attempt. You need to be much more familiar with your camera and how to take photos in general before you will successfully use low light conditions to your advantage as a photographer. (Speaking from experience)


Natural low light conditions begin somewhere towards the beginning of blue hour in the evening and continues through twilight and into full night. Low light will last until the early minutes of golden hour at dawn. Remember, you can also artificially create low light conditions any time you want by artificially darkening an enclosed area such as a building or a room.

If you want to make low light conditions work, you need to set up your camera to take a long exposure. This exposure can be several seconds to minutes to hours even. No human being can hold still for that long without blurring the photo. This is why you’ll almost never see low light portraits (post-processing doesn’t count). Animals are notoriously uncooperative with photography in general so you will not get an animal to hold still for a quality low light photo of any kind.
No human being holding still includes you as the photographer. There’s no way that you can not sway or move at all for a full second to multi-second exposure. This means that most of your attempts to use low light and get a properly exposed photo will result in motion blur. I got lucky once. I have not yet repeated my beginner’s luck in multiple attempts. You will require a tripod for low light photography. I use one myself all the time.

Low light conditions will not give you a full spectrum of light so you may find that your photos are characteristically blue and dark. Reds, oranges, and yellows are most often muted or absent from low light conditions. If an overall blue cast is not your intended final photo color scheme, then you can color correct in post-processing.
Artificial Light
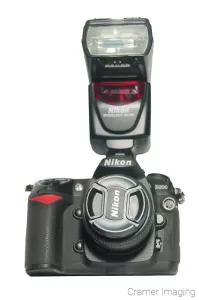
The final kind of light available for photography is artificial light. This is light which you add to a scene in front of your camera. Oftentimes this light takes the form of a camera flash, which you’re probably already familiar with. However, it can also include other bigger and more powerful forms of studio lighting which you might have seen if you’ve had your portrait taken (school portraits if nothing else). You might have seen umbrellas or giant white boxes attached to these strobes (industry jargon).
Artificial lighting is, by definition, artificial. This means it’s man-made. It’s not naturally part of the scene in front of your camera but has been added by you (the photographer) in order to create your photograph. Do bear in mind that shining unfiltered artificial lighting directly onto your subject is often extremely unflattering. Even artificial light needs to be indirect for best results. Artificial light can be reflected around just like ambient light can for better photographic results.

Artificial light is a good way to add light to a low/no light situation or to add some fill light into important but often dark places such as faces. Using artificial lighting, you can practically eliminate unwanted shadows from your photography if you know what you’re doing. For properly lighting an indoor setting, you often need to add some artificial light to ambient light for a proper exposure. Some serious studios will only use artificial lighting. Other serious studios will use colored gels over their strobes to create moods with particular colors of lighting. Practically every genre of photography out there (except landscape photography) uses artificial light in some fashion.

Just like with ambient lighting, artificial lighting can overexpose, properly expose, or underexpose a photograph depending upon its application. However, artificial light’s primary function is to compensate for ambient lighting’s shortfalls and properly light a scene in front of your camera. Do keep in mind that the smaller the light source, the more limited the space it will light up. The small built-in camera flashes you’ve seen won’t add much light to a big scene no matter how bright they seem close up. Bigger strobes will add more to a scene but even those have their limits.

Another point of note is that artificial lighting, no matter how bright, will not give you a full spectrum of light (deep red through violet). Take the notorious fluorescent light for example. It may seem like it’s emitting white light to you and your eyes when, in fact, it is not. It’s actually emitting a green-toned light but it takes a camera to pick this up. (Your eyes are amazing to filter this green tone out, aren’t they?)
Fluorescent lights also run at 60Hz. For those of you who haven’t studied physics, this means that you don’t get the full spectrum of light every nanosecond. A fluorescent light cycles through the spectrum it generates every 1/60 seconds. This means that the fastest shutter speed you can have, while under fluorescent light, is 1/60 seconds unless you want your photos to look really weird thanks to a lack of full color spectrum.


You must also use multiples of 1/60 seconds such as 1/30 or 1/15 seconds for the full spectrum the fluorescent light offers. Still, you can’t avoid that green cast. You can only compensate for it with white balance adjustments, green flash gels, pink filters, and post-processing. Each has varying levels of success or failure when it comes to color-correcting for fluorescent light.
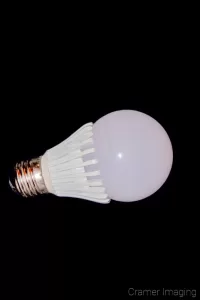
While fluorescent lights are a special case, no artificial light gives you a full spectrum of light the way that the sun does. Incandescent, LED, it doesn’t matter: none of them are full spectrum. However, we’ve been making huge strides in that department lately for the purpose of photography and other art. Full spectrum light bulbs are on the market but are currently very expensive. They’ll come down in price over time but will probably not become mainstream as far as average consumers are concerned.
Conclusion
Of the several elements which can affect picture quality, perhaps light is the most obvious and the most important/basic part. Without it, there can be no photograph. With too little of it, there’s no photograph worth having. With too much of it, there’s also no photo worth having. Learning how to control or operate with the given light available is a life-long process for photographers of any kind. Don’t expect to master it in a few days.
Next time, we’ll delve further into the other elements listed which can affect picture quality. Stay tuned for more to come.
Best Sellers
Cramer Imaging Newsletter

Receive monthly updates in your inbox from us.

