So, we’ve started into a series on the photography merit badge for the Boy Scouts of America. It’s time that we added a part 3 covering more of the photography merit badge requirements. We only just started the requirements before and there’s several to go. Let’s dive into the next installment of the photography merit badge.
![]()

Now, for the obligatory disclaimer: I must say that I’m NOT your merit badge counselor (for photography or otherwise). This is especially true if I don’t live in the same council as you do. You will need to find someone local to sign off that you have met the requirements for this photography merit badge. Your local council office can assist you with finding a current photography merit counselor if you don’t know where to find one.
I’m a professional photographer and have been for 10 years so my credentials are enough to call myself a photography merit badge counselor in any council as long as I register as one.
What I can do is to help you out with some of the research and basic learning aspects of the photography merit badge requirements. As there are currently no less than 5 groups of these requirements, I will break this up into 6 different articles for you to digest in your leisure. This article is part 3. You can find links to the other article(s) at the top of this article.
PART 2. ELEMENTS OF COMPOSITION: OTHER ELEMENTS
The second part of the photography merit badge requirements states the following:
2. Explain how the following elements and terms can affect the quality of a picture:
a. Light—natural light (ambient/existing), low light (such as at night), and artificial light (such as from a flash)
b. Exposure—aperture (f-stops), shutter speed, ISO
c. Depth of field
d. Composition—rule of thirds, leading lines, framing, depth
e. Angle of view
f. Stop action and blur motion
g. Timing
Since we already discussed part 2a in the previous article, it’s been marked as completed. Now, we move on to some other parts of light which affect picture quality.
B. Exposure (Aperture, Shutter Speed, ISO)

Many cameras have different “modes” which you can set your camera to and reasonably expect a good photo. There’s outdoor mode, indoor mode, candle mode, night mode, etc. These are often represented on a dial with different symbols which you have to look up in your camera manual if you don’t know what they are. However, these modes are really just automatic settings for the different functions the camera has.
There are really three main functions which make up how a camera creates an image. These are called respectively aperture, shutter speed, and ISO. Since learning what each of these functions are is an important part of completing the merit badge for you, I’ll briefly break down what these are.
Aperture

The aperture of the camera would be the diaphragm of the camera. It directly controls how big the hole is which allows light into the camera. The wider the hole, the more light can enter the camera and strike the sensor. The smaller the hole, the less light can enter the camera. What we are concerned about in photography is how big the diaphragm makes the hole. That hole is critically important.
Aperture is measured in f-stops (f/number). The smaller the number, the wider the aperture/hole (f/4 is wider than f/5.6). The bigger the number, the smaller the aperture/hole (f/22 is smaller than f/16). It is a fraction after all.
Shutter Speed
The shutter of the camera would be the door which opens to let light into the camera. It controls how long light is allowed to enter the camera. The shorter the shutter speed, the less light can enter the camera. The longer the shutter speed, the more light can enter the camera.

Shutter speed is measured in seconds (or fractions of seconds). Obviously, the larger the number, the longer the shutter is open for. The smaller the number, the shorter time the shutter is open for.
ISO
ISO is a different animal from the other two camera settings. It does not control the light at all. Instead, it controls how sensitive or not sensitive the camera sensor is to the light it receives. A less sensitive sensor will not record as much light as a more sensitive sensor will (even with identical aperture and shutter speed settings).

ISO is measured but does not have units attached to it. Most cameras will have 100 or 200 as the lowest sensor sensitivity setting. The high end depends on your camera and how new it is. There are innovations still going on with ISO so the top range keeps increasing. One point to note is that higher ISOs will introduce noise into your photo (unwanted randomly colored pixels which don’t belong). The higher the ISO, the worse the noise will be.
How These Settings Affect Exposure
It should be somewhat obvious that each of these camera functions (also called settings) will affect the final exposure of your photo. The more light which is let into the camera (shutter speed and aperture), the greater the chance of an overexposure. The less light which is let into the camera (also shutter speed and aperture), the greater the chance of an underexposure. Also, the more sensitive the sensor, the greater the chance of overexposure. The less sensitive the sensor, the greater the chance of underexposure. It seems like a complicated mess but it’s really a delicate balance.

Together, aperture, shutter speed, and ISO make up something called the “exposure triangle.” It’s like coordinates on a graph. You need each coordinate to find the point. However, this does come with a benefit. If you can’t control one setting, you can adjust with the other 2 settings and still get a properly exposed photograph. This is called equivalent exposures.
If you would like to read a bit more in-depth about the exposure triangle and how you can manipulate it for certain kinds of photos, then check out this article where I go into greater depth on the subject.
C. Depth of Field
Depth of field is a concept which you should be familiar with even though you might not know what it is. Simply put, depth of field is how much area in the photograph is in focus and how much is blurry (not motion blur).

Depth of field is controlled completely by the camera’s aperture. You know how we said that the wider the aperture the more light can come in? Well, the wider the aperture, the shallower the depth of field. This means that the wider the aperture, the less area (perhaps a better word would be volume) of space which will be in focus. The smaller the aperture, the more volume of space will be in focus.
Take a look at these two photos below for an example.


In each picture, you can see there is a can full of some pencils and pens. There is also a cluttered bookcase in the background. In the first (left) shot, you can see that the books are somewhat blurry which allows you to focus your eyes more on the can and its contents. In the second (right) photo, it becomes much more difficult to differentiate the can from the background as everything is much more in focus.
The first (left) picture demonstrates what we call a shallow depth of field while the second (right) photo demonstrates what we call a deep depth of field. A shallow depth of field is good for isolating your subject from the background while a deep depth of field will blend your subject with the background or show you a much greater area in focus (think landscape photos).
If you’d like to read up more on shallow depth of field, then check out this article on how to create soft bokeh in your photos. Bokeh is that out-of-focus part of the photo which appears blurry.
D. Composition

Perhaps one of the easiest parts of photography to learn is that of composition. It’s easy to show and to visualize with the right aids. Composition is one place which separates a snapshot (no artistic value) from a photograph (some artistic merit). Composition is done in the viewfinder of the camera before you click the shutter. It can be slightly adjusted later in post-processing if there’s something like a crooked horizon line.
There are several different methods of composition available to you as a photographer. I’ll cover the ones required by the merit badge as an introduction to photography composition. As I do so, keep in mind that you can use multiple techniques in the same photo. You are not just limited to one composition technique per photo you take. Also, keep in mind that there are other composition techniques which are not covered by the merit badge requirements.
Rule of Thirds
One of the worst (though sadly extremely common) composition tactics is to position your subject in the exact center of the picture. That’s a good way to make something look like a snapshot. One of the easiest ways to combat that terrible composition is to use the rule of thirds.
The rule of thirds is a very easy rule to see and to use. Simply divide the area in your viewfinder into 9 equally sized rectangles (or thirds vertically and horizontally). Then position major elements of your photos along those imaginary lines.

Check out these 2 examples below and notice how I’ve lined things up in my photos so that the imaginary lines overlap elements of my photos.


Leading Lines
Leading lines is a composition technique which is used to draw the viewer deeper into the photograph without their eyes actually leaving the edges of the photo. There are lines which your eyes naturally follow into the depths of the photo. The technique is most effective when the lines point to something of interest and focus in the photo. Leading lines which point to nowhere are worthless in photographic composition.
Let’s observe the following photo for an example of leading lines.

Can you see the lines leading into the depths of the photo? Perhaps if I gave you a graphic to illustrate this further.

Now can you see the lines leading deeper into the photograph? Can you see that they are also pointing towards the city on the shore and to the rising sun? That’s an effective use of leading lines in photography.
Framing
Framing is a composition technique where you seek to “add a frame within a frame” if you will. You’re already framing things with your viewfinder. You decide what to leave in and what to leave out. When you seek to create some sort of frame (natural or artificial) around a subject in your photo, you are using framing. The frame can be in the foreground or the background. The frame’s position relative to the subject isn’t important. What matters is how the frame surrounds your subject.
Let’s look at an example of framing. Take this photo below.

This photo is a perfect example of the framing composition technique. I’ve created a frame within a frame using this doorway in the rock. It seems to tell more of a story about the area than simply taking a photo of the landscape beyond the doorway would do.
Here are a couple more examples of photos using the framing composition technique. The technique may be more subtle in these photos but it is still present. See if you can catch it for yourself.


Depth
Have you ever looked at a photograph and felt like you were looking at something as flat as a wall? I’ve seen photos like that. In fact, this photo below could easily be described that way.

I don’t know about you, but to me, this photograph feels very flat and 2-D. I don’t feel much depth in it. In fact, I do feel like I’m staring at a wall (albeit a very bumpy and textured wall) when I look at this photo. Ironic, isn’t it?
When it comes to depth, here’s a better example.

When I look at this photo, I feel like I’m staring over some great distance. The reason for this is the layers in the photograph. In this photo, there are three distinct layers of color and a few layers of texture within each color layer. This is what creates a feeling of depth in the photo.
A definition of depth would be difficult to give without first giving you this kind of example. Depth is deliberate overlap of compositional elements to create and artificial feeling of three dimensions in two-dimensional picture.
With this definition in your head now, check out these photos for the compositional technique of depth. Take note of the layers and the overlap used in each photo and how it creates a sense of 3-D in an otherwise flat object.


If you want to draw the viewer in deeper into your photo (in addition to the leading lines) go with layers and overlapping for depth.
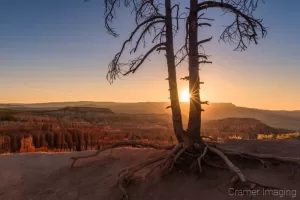
E. Angle of View
Angle of view in photography deals with where you, as the photographer, are and what your point of view is. You can be in all sorts of places when you choose to photograph something. Where you are standing will determine what you and the camera can see thereby determining what will be in your final photograph.

If this sounds very abstract, that’s because it kinda is if you use words only. I feel that this concept (along with most of the other concepts described here) is best shown rather than described. So, here’s angle of view from a visual standpoint.
I’m going to use the famous hoodoo titled “Thor’s Hammer” from Bryce Canyon National Park for illustration.


Many photographers will start out shooting photos from a standing or sitting position. However, that’s where they stop. They will never think about getting up higher or dropping down lower than their chosen subject matter in order to change their view. However, in doing so, they miss out on finding new and exciting angles from which to photograph otherwise boring subjects.

Take time and change your point of view with the camera. You might not always get something new and exciting, but it’s a good habit to get into if you’re serious about photography in your future.
F. Stop Action and Blur Motion
For this next concept, most photographers choose to illustrate the concept with photos of a bicycle in motion or perhaps a car in motion. While this photos do illustrate the point, I’ve got a better way. I’m going to use water in motion.


Here we have two photos of the exact same subject matter: a dam spillway being used. The water is running off no matter which of the two photos you look at. However, both photos are not the same.
The first (left) photo has stopped the motion of the angry water. You can see the froth and foam in action frozen in time. You can even see fish jumping up if you look in the right place.

Stopping the action is meant to catch a moment and freeze it forever. That could even mean a terrible look on someone’s face (think athletes in pain at the moment of impact). Blurred motion is meant to convey a sense of motion over time. A blurred motion photo is one which the shutter is open for longer and captures more time than a stopped action photo.
The second photo from above has blurred out the motion of the water. It’s softer overall but still conveys an overall sense of motion in the blur. The water looks soft and silky rather than angry and frothy but the water still appears to be in motion. You aren’t freezing a single moment in time with the second photo but rather showing motion over time.
A few points to consider: if you try to stop the action of a car in motion, it will simply look stationary if you succeed. A blurred motion photo will cause you to lose detail with your subject and can even cause you to lose focus of it too. Choose which technique to use carefully as it might not work out as you hoped in the final photograph.

G. Timing
Timing is a concept with which you should be familiar at this point. It’s about having the right thing happen at the right moment. Bad timing would be something happening at the wrong moment. In photography, timing is everything once you’ve mastered the basics. Let’s illustrate this concept further.
I’m using firework photographs here. In firework photos, you want to see the entire firework from initial explosion to final burnout. This means a multi-second exposure. However, if you don’t anticipate and time things properly with a firework, you will miss part of the display and it will affect how the final photo looks (here’s a clue: it’s not in a good way either). Compare these two firework photos for an example.


The first photo (left or top) shows a perfectly captured group of three golden fireworks. You can see a point of origin for each and every firework in the shot. However, the second photo (right or bottom), is just a bright red mess. Ignoring the smoke, which sometimes happens in firework photography, you don’t see a point of origin. There’s a hinted central point of explosion but you can’t tell where it is. This second photo was badly timed and it’s a mess because of poor timing.
Conclusion
There are a lot of factors at play when it comes to affecting the final quality of a photograph. Other than light (discussed last week), we have camera settings, depth of field, composition, angle of view, stop action vs. blurred motion, and timing. Each of these play a part in the quality of the photo you take when you click the shutter button.
I’ll tell you now. I had no idea that it was the complex when I first started into photography. I thought it was as simple as turn on the camera, frame your shot, and click the shutter. Done. Was I surprised to learn about all the nuances which we’ve just discussed. It took me time to master the basics of each element discussed so far so don’t expect to master these concepts overnight. Take time and really internalize them if you want to pursue photography seriously.
Next week, we’ll discuss the next point of the photography merit badge: camera operations.
Best Sellers
Cramer Imaging Newsletter

Receive monthly updates in your inbox from us.

