We’ve been going for 4 weeks now on the Boy Scouts photography merit badge requirements. We’re over halfway there and now rounding the bend but we’re not done yet. There’s still plenty more to discuss about the photography merit badge. Are you ready for another installment? Here we go with part 5.
![]()
Continuing obligatory disclaimer: I must say that I’m NOT your merit badge counselor (for photography or otherwise). This is especially true if I don’t live in the same council as you do. You will need to find someone local to sign off that you have met the requirements for this merit badge. Your local council office can assist you with finding a current photography merit counselor if you don’t know where to find one.

So, what about me? Why am I discussing the photography merit badge as an expert? Let me tell you a little bit about myself. I’m a professional photographer and I have been for 10 years so my credentials are enough to call myself a merit badge counselor in any council as long as I register as one in my local Boy Scout council. You may easily check my photographer credentials by checking out all my photos here on my website. My best are available for sale in my online store.
What I can do for you is to help you out with some of the research and basic learning aspects of the photography merit badge requirements. As there are currently no less than 5 groups of these requirements, I will break this up into 6 different articles for you to digest the information in your leisure. This article is part 5. You can find links to all of my other photography merit badge article(s) at the top of this article.
Part 4: Post-Processing
The fourth part of the merit badge requirements states the following:
6. Describe how software allows you to enhance your photograph after it is taken. Select a photo you have taken, then do ONE of the following, and share what you have done with your counselor.
a. Crop your photograph.
b. Adjust the exposure or make a correction.
c. Show another way you could improve your picture for impact.
Post-processing is the process of developing a photo so that it looks its best when presented to others. During the days of film, this process was done entirely in a dark room. Nowadays we have a digital dark room where we develop our digital images on computer.
Software Options

The most popular pieces of software for post-processing are Adobe products called Photoshop and Lightroom. Perhaps you’ve heard of the first. These are high-end pieces of software which are very powerful once you know what you’re doing.
I had to take a couple college classes to scratch the surface with Photoshop. I had to do a great deal of independent study of Lightroom to learn what to do. Basically what I’m saying is that you cannot pick up these pieces of software and intuitively know what to do. They will take time and study. However, there are other options out there for a budding photographer such as yourself.
The GIMP is a popular freeware piece of software which you can download and start using today. It’s built to mimic many of the functions of Photoshop but might call some of these functions by a different name. The GIMP even has a Lightroom equivalent called Darktable if you prefer batching your photos like I do.

If you’re simply looking to finish up the merit badge and not pursue photography seriously, then I recommend the GIMP and Darktable for this portion of your requirements. If you’ve decided to become more serious, you might research other post-processing software as there are other free or low-cost options out there. Photoshop and Lightroom are professional-grade software and their prices reflect that. Don’t purchase a license to (or buy a subscription for) software which you don’t know if you’ll want to keep using. That’s expensive and your parents probably won’t go for that.
Basic Post-Processing
What you will be attempting for this portion of the merit badge is referred to as basic post-processing. It can be destructive (think permanently altering the image the way that Photoshop can) or non-destructive (think saving all the edits in a separate sidecar file the way that Lightroom can).

The header of this section also begs the question about more advanced post-processing. Does it exist? Yes it does. Sky replacements are prominent on the list of more advanced post-processing techniques. However, advanced techniques are beyond the scope of this merit badge and would take much longer to explain. So we’ll stick with the merit badge basics.
Cropping
Since the photography merit badge requires you to crop a photo for impact, I’m going to walk you through that simple process. When you want to crop a photo, you will need to look for this symbol in your software or you will need to search through the menus for the cropping option.
This is the symbol for cropping. It’s fairly universal so you should see this or similar in each and every piece of software which you could use for post-processing.
As I use Photoshop and Lightroom exclusively, that’s all I’ll have to show you. Please keep in mind that the GIMP and Darktable will have similar names for most functions but will have a different user interface.


Cropping is about choosing what to include and what to remove. As you can see from my example above, I chose to remove the pickup truck and a good chunk of sky from the photo. I felt that the truck detracted from the impact of the overall photo so I removed it with crop. There was also too much sky in the shot so I took the time to reduce some of that to better emphasize the helicopter and the boats. I also decided to line the helicopter line up with the rule of thirds during the crop.
If you feel that there is something which is simply too much for the photo you want, you might consider cropping it out. Cropping works best when the element(s) you want to remove are close to the edges of the photo. If what you want removed is close to the center, cropping is not a good option.

Also, keep in mind that too much cropping will result in a tiny photo with very low resolution. Use cropping sparingly and you should have a decent-sized photo with a decent amount of pixels left over.
Exposure and Color Correction

Exposure and other color correction work is another part of post-processing. It involves making the photo and its colors look properly bright and saturated for how you want your final photo to look like.
When it comes to color correction, you play with 2 basic portions: the black and white balance and the color balance. You can make global adjustments or regional adjustments depending upon what you want to do with the photo.
Exposure, along with other settings, will adjust the overall black and white balance globally (across the entire photo at once) in the photo. You can brighten or darken things up as you see fit. Exposure will not affect the color balance.
Saturation, along with other settings, will adjust the overall color balance globally in the photo. You can alter colors as you see fit. Saturation will not affect the black and white balance.
You are given several different tools by which to change the black and white or the color balance. They go by several different names such as levels, clarity, dodging and burning (darkroom terminology), highlights and shadows, vibrance, curves, contrast, etc. Each of these tools affects the balance differently than others do.

As always, other programs will have a different user interface and possibly different names for the same function. If you’re not using Lightroom or Photoshop, then make sure you know what the names are for the tools you want to use.
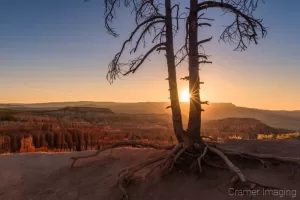
Now, let’s do a side-by-side comparison of a before and after. This is a photo I took where I needed to adjust the exposure and the color in order to get the final landscape photo I wanted.
Now, obviously, the raw photo (left/top) is underexposed and the colors are muted compared to the final photo (right/bottom) which is much better exposed and the colors are more vibrant.
Most black and white balance and color balance adjustments are a slider which you can use to make very precise adjustments. Often accompanied with the sliders are numeric adjustments which can be just as, if not more precise, than a mouse in your hand on a slider can. You simply slide the adjustment slider back and forth until you’re satisfied with what you see on screen. That’s how you generally adjust for exposure and other forms of color correction.

Now, I must say a few words about the photo’s color temperature and tint. These sliders are not to be messed with carelessly. The temperature slider will adjust how warm or cold the photo feels by adjusting the yellow vs. blue balance in the photo. The tint slider will adjust a similar scale except that it’s the green vs. magenta balance.

My photography professors warned me that I shouldn’t mess with the green and magenta in a photo if I don’t know what I’m doing. It can go dramatically wrong if you’re just messing around. They were right. I’ve made people’s skin in photos look purple by messing with that slider ignorantly. I’m passing the same piece of wisdom on to you. Don’t mess with the green and magenta sliders until you really know what you’re doing.


Here are 2 terrible examples of what can happen if you improperly adjust the green/magenta slider. I even received comments about how purple these images were.
Other Methods of Enhancement
There are several different ways which you can process up your photos for better impact. Many of these options are what you might call more advanced techniques. However, I’m going to discuss a couple of the more simple options out there which you should be able to do easily for your merit badge. These are spot removal and sharpening.
Spot Removal
Have you ever taken or seen a photo where there’s an obvious spot which you wish you could remove? I have. That’s where spot removal tools come in so handy.

Thankfully, with the right tools on the right photo, you can clean up those unwanted spots from your photo for a much better impact.
The tools available in in Photoshop are called clone stamp, healing brush, and patch tool. There are other variants too. The Lightroom tools are either a healing or a clone brush. You can resize the stamp/brush tools and feather as much as you need too. Clone stamp/brush copies exactly the area you’re fixing from while heal brush attempts to match the fix-from and fix-to areas to blend things together. The patch tool is you selecting the area yourself.


Most of these tools will involve selecting the area which you want to alter and then choosing a similar area to pull data from in your photo. The clone stamp tool is the opposite where you choose the area you want to fix from (using the Alt key) before you choose the area you want to fix to.
As you are removing undesired spots in your photos, remember that these tools are designed for small select areas. They are not designed to overhaul large portions of your photo. If there’s THAT much wrong with your photo, then I advise going back and re-shooting if you can (I know you can’t always do so).
Sharpening
Perhaps the best option for “another way you could improve your picture for impact” would be sharpening your photo. It’s easy to do (compared to spot removal). However, you can do it wrong.
Lightroom offers sliders for sharpening and various controls for it. Photoshop offers a menu of filters. Some filters come with their own sub-windows to fine-tune filter controls. Others do not.


As I said, sharpening can really add impact to your photo. However, there are a couple of points which I need to caution you about. The first is that sharpening can be taken too far. The second is that sharpening cannot make up for poor focus.
You really can take sharpening too far. When this happens, a photo will start looking wrong. Edges can start looking funny, colors can start altering some, and artifacts can start appearing and making your photo look bad. If that starts becoming the case in your photo, then you need to dial your sharpening back. How much depends upon how far you’ve already gone.

The other point of sharpening not making up for poor focusing is absolutely true. No amount of sharpening is going to bring back something which is terribly out of focus. If you didn’t nail the focus, then you didn’t nail the focus. Sharpening cannot help a photo like this one below.

The smaller resolution helps with the focus problem but doesn’t fix the problem. This photo is so out-of-focus that no amount of sharpening can help it come into focus. I would have to re-take this photo if I wanted to have it in focus.
Conclusion
Post-processing is about taking your photo and making it look its very best. Post-processing can be as simple or as complicated as you choose to make it. The more perfectionist types might really draw things out in post-processing in the hopes of creating a perfect image (here’s a hint: no image can be THAT perfect).
If you’ve got an image which just isn’t working out, it might be a good idea to put it down for a while or permanently. You could try again and perhaps you might find post-processing easier with another shot.
Now that you’ve acquired a basic idea of how to stay safe as a photographer, how to set your scene, how a camera works, and how to post-process a photo, it’s now time to discuss different career options you can find in photography. That’s what we’ll be discussing next week. Stay tuned for the rest of the photography merit badge requirements.


Best Sellers
Cramer Imaging Newsletter

Receive monthly updates in your inbox from us.

