Hanging a picture on the wall isn’t a particularly difficult thing to do. In a pinch, you can hang a fairly heavy piece of art with a few bulletin board tacks pushed into the drywall. Of course, the tacks sometimes fall out and you find your decoration on the floor. So this isn’t exactly the recommended method. Here we will discuss some picture hanging methods we do recommend for hanging your beautiful fine art on the wall.

First of all, this post is strictly about the basic methods of hanging the picture. In an upcoming post, we will cover exactly how to position the item depending on your needs. For simple wall art hangings, just eyeball where you want your artwork wall hanger and mark that spot on the wall. For more complex wall art hangings, see next week’s article.
The Wall Side of Things
How you hang something on the wall depends on several factors. These factors include the weight of the item, the wall material, whether or not your landlord will let you hang something, and more. Sheetrock walls are common, but I’ve lived places with cinder-block walls. The basement of the house I live in now has some concrete walls. Hanging artwork on a concrete wall requires a different method of hanging than attaching something to drywall and you’re going to have to choose your anchors based on your wall composition.

Holes in the Wall Picture Hanging Methods
There are tons of choices out there for wall anchors on which to hang something. The cheapest and most effective of the picture hanging methods is a nice large screw or nail in a wooden stud in the wall. It will take a large amount of weight, won’t pull out, and is sure to be secure for all but the very heaviest items. To illustrate how much a stud can hold, I currently have a 100 pound fish tank sitting on a shelf held in place with large lag bolts in the wall studs.

Using studs to hold up your artwork can be problematic as the studs in most houses are 16 inches apart making precise placement of your art a likely impossibility thanks to that fact. Finding studs can be somewhat difficult. It generally involves either tapping on your wall and listening for the change in sound or using a stud finder which can sometimes find wiring, pipes, or ducting instead. Also, someone not experienced with using a stud finder can find it difficult to properly locate the center of a stud. If you get the screw on the edge of the stud, it might feel firm but it will pull out over time.

At the other end of the spectrum, I’ve hung smaller, lighter items with a small thumb tack. I’ve usually used these when living somewhere I can’t really put visible holes walls to hang something properly. The small tack only puts a very small hole in the wall that, when the item is removed, can only be seen from a couple of feet away. I’ve even had landlords specify that this was the only approved method for hanging things on the wall.
Sticking to the Wall Picture Hanging Methods

Another method of hanging art, which provides minimal damage, is a command strip. Command branded items are fairly cheap and there are many options for hooks and strips depending on what you’re trying to hang. They attach quickly and (usually) remove cleanly. Their only issue is with textured walls. If there is too much of a textured and raised surface, the command strip will not have enough surface area and will fail to attach to the wall. If you have textured walls, don’t use Command strips to hang wall art.
Galleries will often have a carpet-like wall and require you to have Velcro command strips with the rough side on your frame. They can just stick those frames to the wall. You could do something like this, but it’s more for places that are going to change out exhibits rather frequently. Command strips and hooks will work well for some things, as long as they’re not too heavy. You’ll want one of the flatter command hooks, so the picture hangs properly against the wall. You also need to make sure that the wall isn’t textured too much or the command strip will just fall off quickly and damage your art in the process.
Older type mounting squares or mounting tape will also work. They may stick a little better, but rarely come off cleanly. Often, when they do come off, they remove a portion of the paint or even sheet-rock with it. This is highly inadvisable for a rental situation if you want your security deposit back.
Some people use one brand or another of sticky tack or reusable adhesive putty. A material (usually blue) that you can ball up like clay and stick things to walls. I’ve seen it marketed under the name “plasti-tac,” “fun tak,” and “blue tack.” This works pretty well for very light things, but fails miserably for anything very heavy. It will work for a short time. However, after a while it gives out and it starts slowly sliding down the wall until the material gives out completely and the item falls. I’ve seen this tack fail after a few weeks with framed posters. However, it worked for decades on unframed posters. It depends on the size and weight of the item and the amount you use as well as the exact texture of the wall.
Best Generic Method of Wall Attachment
 About the easiest and most secure method is for drywall is to drill a hole and use a molly. These are plastic inserts that just fit the hole you drill. They expand slightly when the screw is inserted to hold on to the wall better. Even simpler to use are mollies that simply screw into the wall with a Phillips drive head attached to a drill. You could use a screwdriver to drive a screw in but it would be unpleasant and time consuming for you.
As with all other wall hangings, make sure you measure carefully so that the picture will actually hang at the level you want it, particularly when using something like mollies since you’re putting a hole in your wall. If it’s only off a little, you’re not going to be able to move it by just a little. Moving a screw six inches is easy, moving it a quarter of an inch is likely impossible due to the size of the mollies. Remember: measure twice, cut (or drill) once.
The Art Side of Things
OK, now we’ve only covered things we put on the wall to make the attachment, we haven’t covered what we put on the picture frame or other item to let it hang on the wall.

Picture Wire
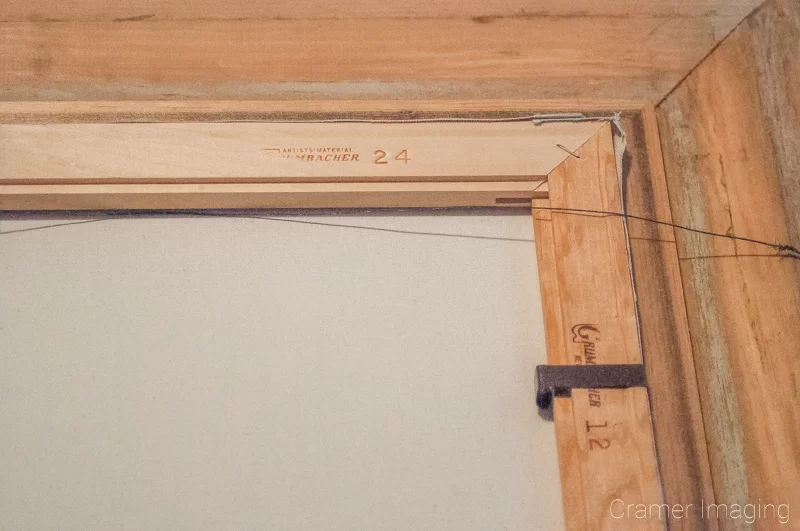
For fine art photos and paintings, one of the more traditional picture hanging methods is using picture wire. The advantage to picture wire is that it will slide side to side easily to balance the frame.
The best method for attaching picture wire is with wire hangers. Simply screw the hangers into the back of the picture evenly on each side. Then, run the picture wire between them and twist it at each end until secure. When screwing something to a frame, be sure to pre-drill the holes to prevent the wood from splitting.

Be sure that the wire hangers are low enough down and the wire short enough that it doesn’t show above the edge of the frame when you hang it. You should also put some frame bumpers on the back of the frame to prevent it from marring the surface. They can also allow the picture to move a little left or right and the friction with the wall will keep the frame from tipping.
Alligator Hooks
A common method on some cheaper store frames are saw-tooth hangers. These have some of the same advantages of picture wire in that you can move them back and forth. You do this both to balance the frame and to make sure that it is positioned correctly. They also lay flatter on the wall than the picture wire hooks do. They are cheaply obtained, and tack nailed or even screwed to the back of the frame. Again, pre-drill the holes to stop the frame from splitting.

Built-In Hanging Methods
Some frames and other hanging knick-knacks have some sort of hole or holes built-in on the back. With these, just put the hole over the nail or screw or whatever to hang the item. Some items may even have more than one. I have a four picture frame that has two slots on the back for hanging it. It basically hangs flush to the wall, it’s about 20 or so inches wide but only about 8 inches tall.

To mark the wall where I wanted it, I cut out a paper the same size as the frame. Then I attach the paper to the back of the frame. Then, I poked holes in the paper where the tacks would go once it was in position. I used them to mark the wall where I needed to put the tacks. Basically I made a template, of the frame and was able to place that perfectly with ease. Then I simply hung the frame in place.

Conclusion
When hanging fine art on the wall, you need to consider things from the wall and the art side. You must thing of how the art will hang and what it will hang on. Whatever picture hanging methods you choose to hang your fine art with, make sure the method works with the wall material and texture, any rental agreements you may be under, the frame the art is in, and the room itself. If you consider all of these elements, you should have an attractively hung picture. Be sure to come back for our next installment on how to position your art for maximum impact.

Best Sellers

Cramer Imaging Newsletter

Receive monthly updates in your inbox from us.

